
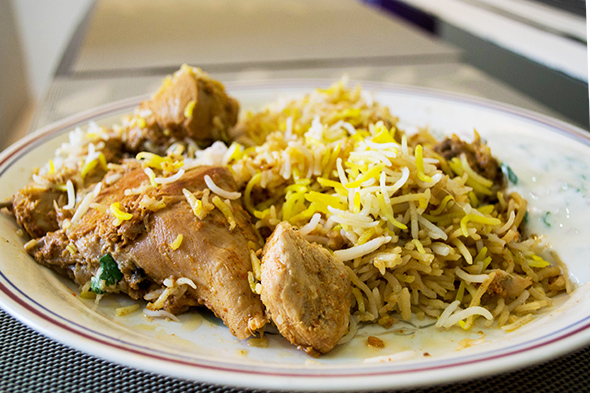
There's good biryani and then there's good biryani. So utterly delicious, that if you're on a diet, it's possibly the worse of obstructions. So let's keep that diet on the backseat for just a day and work up an appetite for this ridiculously tasty aromatic one pot meal, with tender chicken seasoned with a host of flavorful Indian spices and garnished with crisp, gold onions n' fresh herbs.
You'll want to have company while you have a hearty laugh and cozy chats over this one!

They say that making Biryani is a difficult dish to master, but this post outlines the whole process into just three steps. If you follow them to the T, it's a foolproof way to impress those guests. Don't let the ingredients overwhelm you, they pack the delicacy with loads of flavor!

You can find them in the Asian food aisle at the store, just in case they look like a hard find. :)
Hyderabadi Chicken Biryani
Serves: 4-6 people
Steps:
1. Chicken Marination
2. Rice preparation
3. Layering the Biryani
Step 1: Chicken Marination
Ingredients:
1. Chicken - 1 kg
2. Onions fried till golden - 1 big cup
3. Oil - 1/2 cup ( the oil left after frying onions can be used)
4. Yogurt - 200 g
5. Ginger garlic paste - 1 1/2 heaped tablespoons
6. Red chili powder - 1 tsp
7. Coriander powder - 1/2 tsp
8. Garam Masala powder - 3/4 tsp
9. Cardamom powder - 1/2 tsp
10. Cinnamon powder - 1/2 tsp
11. Salt - 3/4 tsp
12. Shah zeera (black cumin seeds) - 1/2 tsp
13.Cinnamon (whole) - 1 inch stick
14. Cloves (whole) - 3 to 4
15. Cardamom (whole) - 3 to 4
16. Green chilies - 3
17. Bay leaves - 1 (optional)
18. mace - 1/4 tsp (crushed,optional)
19. Juice of one big lemon
How-to
1. Keep aside half the quantity of fried onions and mix rest of the ingredients well.
Then add the remaining ingredients and mix lightly.
2. Cover and marinade overnight in a refrigerator. (Make sure you marinate for at least 3-4 hours for proper marination if you can't do it overnight.)
7. Keep changing the position of the base of the pot 2-3 times to provide heat evenly on all sides.
8. Serve topped with the fried onions, cilantro, mint and sliced boiled eggs for the ultimate gratification.


Biryani is often served with raita (seasoned yogurt) or a variety of curries.
You'll want to have company while you have a hearty laugh and cozy chats over this one!
They say that making Biryani is a difficult dish to master, but this post outlines the whole process into just three steps. If you follow them to the T, it's a foolproof way to impress those guests. Don't let the ingredients overwhelm you, they pack the delicacy with loads of flavor!
You can find them in the Asian food aisle at the store, just in case they look like a hard find. :)
Hyderabadi Chicken Biryani
Serves: 4-6 people
Steps:
1. Chicken Marination
2. Rice preparation
3. Layering the Biryani
Step 1: Chicken Marination
Ingredients:
1. Chicken - 1 kg
2. Onions fried till golden - 1 big cup
3. Oil - 1/2 cup ( the oil left after frying onions can be used)
4. Yogurt - 200 g
5. Ginger garlic paste - 1 1/2 heaped tablespoons
6. Red chili powder - 1 tsp
7. Coriander powder - 1/2 tsp
8. Garam Masala powder - 3/4 tsp
9. Cardamom powder - 1/2 tsp
10. Cinnamon powder - 1/2 tsp
11. Salt - 3/4 tsp
12. Shah zeera (black cumin seeds) - 1/2 tsp
13.Cinnamon (whole) - 1 inch stick
14. Cloves (whole) - 3 to 4
15. Cardamom (whole) - 3 to 4
16. Green chilies - 3
17. Bay leaves - 1 (optional)
18. mace - 1/4 tsp (crushed,optional)
19. Juice of one big lemon
How-to
1. Keep aside half the quantity of fried onions and mix rest of the ingredients well.
Then add the remaining ingredients and mix lightly.
2. Cover and marinade overnight in a refrigerator. (Make sure you marinate for at least 3-4 hours for proper marination if you can't do it overnight.)
Step 2- Preparing the rice
Ingredients:
1. Long grained Basmati Rice - 3 cups/500g (wash well and soak in water with a little salt for half an hour)
2. Shah zeera (black cumin) - 1/2 tsp
3. Oil - 2-3 tbsp
4. green chilies - 2
5. cinnamon sticks -Two, 1 inch sticks
6. cloves - 3 to 4
7. green cardamoms - 3 to 4
8. bay leaf (optional) – 1
9. cilantro leaves and mint, chopped - 1/2 cup
10. Salt - 1 tsp
11. Water - 8 cups ( enough to cover 2 inches above the rice level )
How-to :
1. Put water to boil in a large heavy-base cooking pot.
2. Add the Shah zeera (black cumin), cardamom, cinnamon, cloves, bay leaves, cilantro
leaves, mint, green chilies, oil and salt.
3. When the water starts boiling, add rice and cook on high till the water boils again
4. Simmer the rice for 2-3 minutes (so that the rice is cooked up to 70%.)
2. Add the Shah zeera (black cumin), cardamom, cinnamon, cloves, bay leaves, cilantro
leaves, mint, green chilies, oil and salt.
3. When the water starts boiling, add rice and cook on high till the water boils again
4. Simmer the rice for 2-3 minutes (so that the rice is cooked up to 70%.)
5. Drain the rice and keep aside.
Step 3: Layering the Biryani
Ingredients:
1. Marinated Chicken Mixture
2. 1/2 cup fried onions reserved earlier + a tablespoon of sliced onions
3. Chopped cilantro and mint leaves - half cup each
4. Green chilies - 2
5. 1/4 tsp crushed Saffron soaked in 1/4 cup warm milk + a pinch of Saffron food coloring
6. Par-boiled rice prepared earlier.
7. 1/4 cup oil mixed with 2-3 tbsp ghee / clarified butter
8. 1/4 cup lemon juice
How-to
1. First arrange the marinated Chicken in a similar heavy-based big pot.
2. Top it with sliced onions and half of the reserved fried onions, cilantro leaves, mint.
3. Spread the par-boiled rice and top it with the remaining fresh herbs, green chilis and the remaining fried onions.
4. Sprinkle on the oil + ghee mixture evenly, lemon juice, and the saffron soaked in milk.
5. Cover the pot with aluminum foil, then the lid and put on high heat for about 5 minutes until you can see steam escaping from the sides of the lid.
6. Now put the pot to simmer on low heat and put the biryani to dum (sealing the lid and cooking on low heat) for 20-25 minutes.
7. Keep changing the position of the base of the pot 2-3 times to provide heat evenly on all sides.
8. Serve topped with the fried onions, cilantro, mint and sliced boiled eggs for the ultimate gratification.
Biryani is often served with raita (seasoned yogurt) or a variety of curries.
You need to try this, no questions; and when you do, let me know how it turned out or mail me a picture! I'd love for you to share it with me!
Check out my step by step tutorial on making mutton biryani too!
Pin this recipe and share it with all the foodies in your life!
Stay happy and have a great weekend,
Nash


